Interacting with the blockchain
In this lesson, we are going to take the code we used in building a blockchain, and turn it into an interactive API endpoint using Flask.
If you haven't done the lesson on building a blockchain, it is recommended you go back and do that before doing this lesson.
In this lesson, we will cover these 4 steps.
- Implementing a basic proof of work
- Making our blockchain an API endpoint
- Creating a miner for your blockchain
- Interacting with the blockchain
Things we need:
You will need to have Python 3.6 or higher along with pip installed. To install Python click here
Once Python is installed, we then need to install Flask and the requests library.
To install these open up your terminal and type the following:
pip install Flask==0.12.2 requests==2.18.4
Open up your blockchain.py file from the previous lesson.
At the top of your file import all of these
import hashlib
import json
from time import time
from typing import Any, Dict, List, Optional
from urllib.parse import urlparse
from uuid import uuid4

import requests
from flask import Flask, jsonify, request
We will also require a HTTP client, I'm going to recommend postman, as it is an easy to use interface.
Step 1 - Implementing a basic proof of work
Understanding Proof of Work
A Proof of Work algorithm (PoW) is how new Blocks are created or mined on the blockchain.
The goal of PoW is to discover a number which solves a problem. The number must be difficult to find but easy to verify for anyone on the network. The number is made of cryptographic signatures, meaning that if the wrong number is sent somewhere it will be denied access. Thus the PoW algorithm means you can now send money without having to trust anybody or any organisation, as the blockchain only cares about the cryptographic signatures. This is the core idea behind Proof of Work.
We’ll look at a very simple example:
Let’s decide that the hash of some integer x multiplied by another y must end in 0. So, hash(x * y) = ac23d….0. And for this simplified example, let’s fix x = 10.
Implementing this in Python:
from hashlib import sha256
x = 10
y = 0  # We don't know what y should be yet...
while sha256(f'{x*y}'.encode()).hexdigest()[-1] != "0":
    y += 1
print(f'The solution is y = {y}')
The solution here is y = 24. Since, the produced hash ends in 0: hash(10 * 24) = 1253e9373e…5e3600155e860
Just before we add our PoW code, We will need to add some code that will doing the hashing of the block for us.
Here is the code:
 @staticmethod
    def hash(block: Dict[str, Any]) -> str:
        """
        Creates a SHA-256 hash of a Block
        :param block: Block
        """

        # We must make sure that the Dictionary is Ordered, or we'll have inconsistent hashes
        block_string = json.dumps(block, sort_keys=True).encode()
        return hashlib.sha256(block_string).hexdigest()
If you want to learn more about hashing, check out our lesson on Hashing Functions
The PoW algorithm is what miners race to solve in order to create a new block. The difficulty is determined by the number of characters searched for in a string. The miners are then rewarded for their solution by receiving a coin via a transaction.
Below we will implement our own basic proof of work for our blockchain:
    def proof_of_work(self, last_proof: int) -> int:
        """
        Simple Proof of Work Algorithm:
         - Find a number 0' such that hash(00') contains leading 4 zeroes, where 0 is the previous 0'
         - 0 is the previous proof, and 0' is the new proof
        """

        proof = 0
        while self.valid_proof(last_proof, proof) is False:
            proof += 1

        return proof

    @staticmethod
    def valid_proof(last_proof: int, proof: int) -> bool:
        """
        Validates the Proof
        :param last_proof: Previous Proof
        :param proof: Current Proof
        :return: True if correct, False if not.
        """

        guess = f'{last_proof}{proof}'.encode()
        guess_hash = hashlib.sha256(guess).hexdigest()
        return guess_hash[:4] == "0000"
Step 2 - Making our blockchain an API endpoint
Add the below code to the bottom of your Python file. This code turns your file into an API end point. This will allow us to use postman to send/receive requests in our blockchain.
More on Flask API endpoints here
class Blockchain(object):

# Instantiate our Node
app = Flask(__name__)

# Generate a globally unique address for this node
node_identifier = str(uuid4()).replace('-', '')

# Instantiate the Blockchain
blockchain = Blockchain()


@app.route('/mine', methods=['GET'])
def mine():
    return "We'll mine a new Block"

@app.route('/transactions/new', methods=['POST'])
def new_transaction():
    return "We'll add a new transaction"

@app.route('/chain', methods=['GET'])
def full_chain():
    response = {
        'chain': blockchain.chain,
        'length': len(blockchain.chain),
    }
    return jsonify(response), 200

if __name__ == '__main__':
    app.run(host='0.0.0.0', port=5000)
Now if you open a terminal in the location of your file, and type python blockchain.py it will start the server.
Now we need to add this below code under your new flask server code. This code will allow you to POST a new transaction over the web to your blockchain.
@app.route('/transactions/new', methods=['POST'])
def new_transaction():
    values = request.get_json()

    # Check that the required fields are in the POST'ed data
    required = ['sender', 'recipient', 'amount']
    if not all(k in values for k in required):
        return 'Missing values', 400

    # Create a new Transaction
    index = blockchain.new_transaction(values['sender'], values['recipient'], values['amount'])

    response = {'message': f'Transaction will be added to Block {index}'}
    return jsonify(response), 201
This is what a Transaction will look like, the user will send this over the server.
{
 "sender": "my address",
 "recipient": "someone else's address",
 "amount": 1
}
we are almost ready to start interacting, all we need now is a way to mine a transaction.
Step 3 - Creating a miner for your blockchain
The below code will create a miner for your server, This will mine and create a new transaction to be placed on a block in your blockchain.
Add this code, below your new transaction code.
@app.route('/mine', methods=['GET'])
def mine():
    # We run the proof of work algorithm to get the next proof...
    last_block = blockchain.last_block
    last_proof = last_block['proof']
    proof = blockchain.proof_of_work(last_proof)

    # We must receive a reward for finding the proof.
    # The sender is "0" to signify that this node has mined a new coin.
    blockchain.new_transaction(
        sender="0",
        recipient=node_identifier,
        amount=1,
    )

    # Forge the new Block by adding it to the chain
    block = blockchain.new_block(proof=proof, previous_hash=0)

    response = {
        'message': "New Block Forged",
        'index': block['index'],
        'transactions': block['transactions'],
        'proof': block['proof'],
        'previous_hash': block['previous_hash'],
    }
    return jsonify(response), 200
We will be able to use this code to interact with our blockchain, See it be mined, and then check the chain to see that the transaction has taken place.
Step 4 - Interacting with the blockchain
Start up your server.
python blockchain.py

Running on http://127.0.0.1:5000/ (Press CTRL+C to quit)
Now open up postman, at the top of postman you will see a search bar. Make sure the button to the left of it is set to GET.
Then type into the bar http://localhost:5000/mine
This is what it should look like.
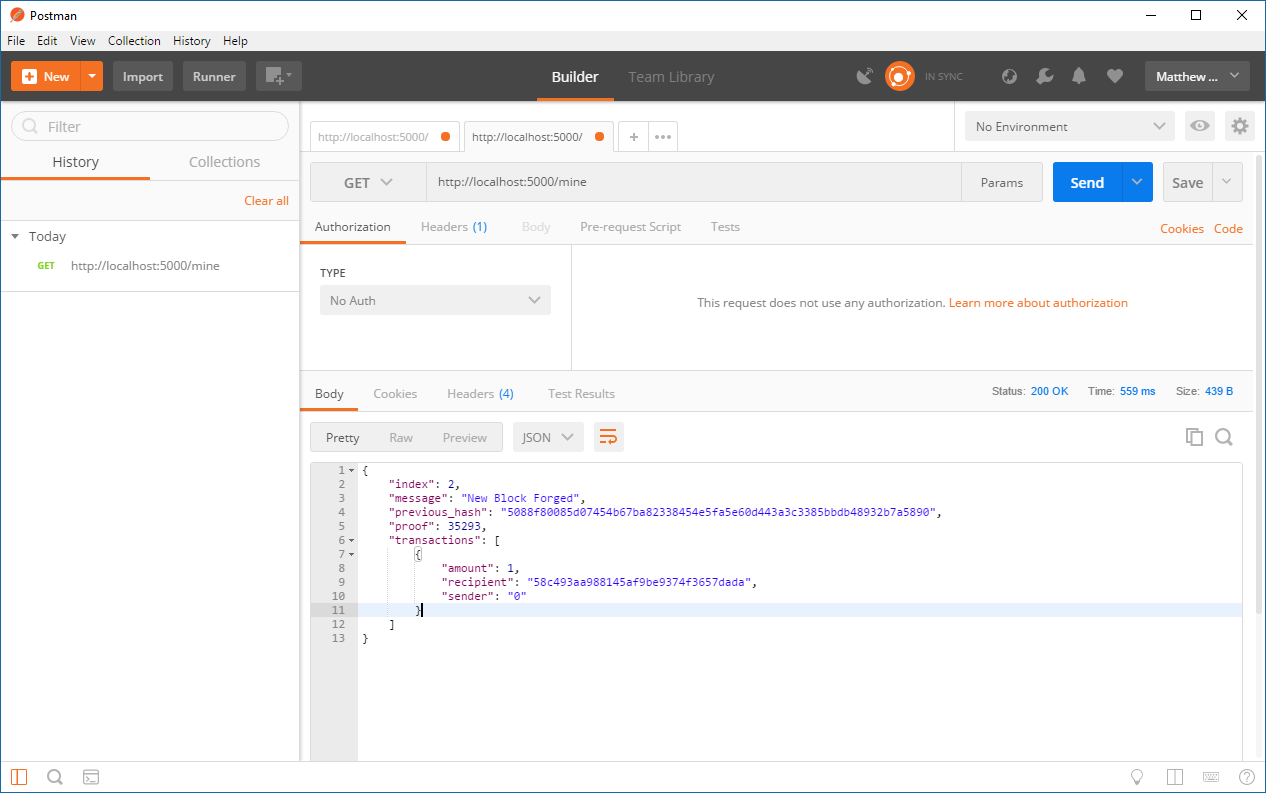
In this image, we have now mined our blockchain, Which has created our first block. We can see the block number index is 1 and its hash is also 1
Now we can make a new transaction by changing the GET option to POST and typing in http://localhost:5000/transactions/new
(not that this specific blockchain will only do 1 transaction per block at a time)
![]()
Finally, we can view the blockchain to now see the new transaction.
Turn the POST command back to a GET and type in http://localhost:5000/chain
you will be displayed with this screen.
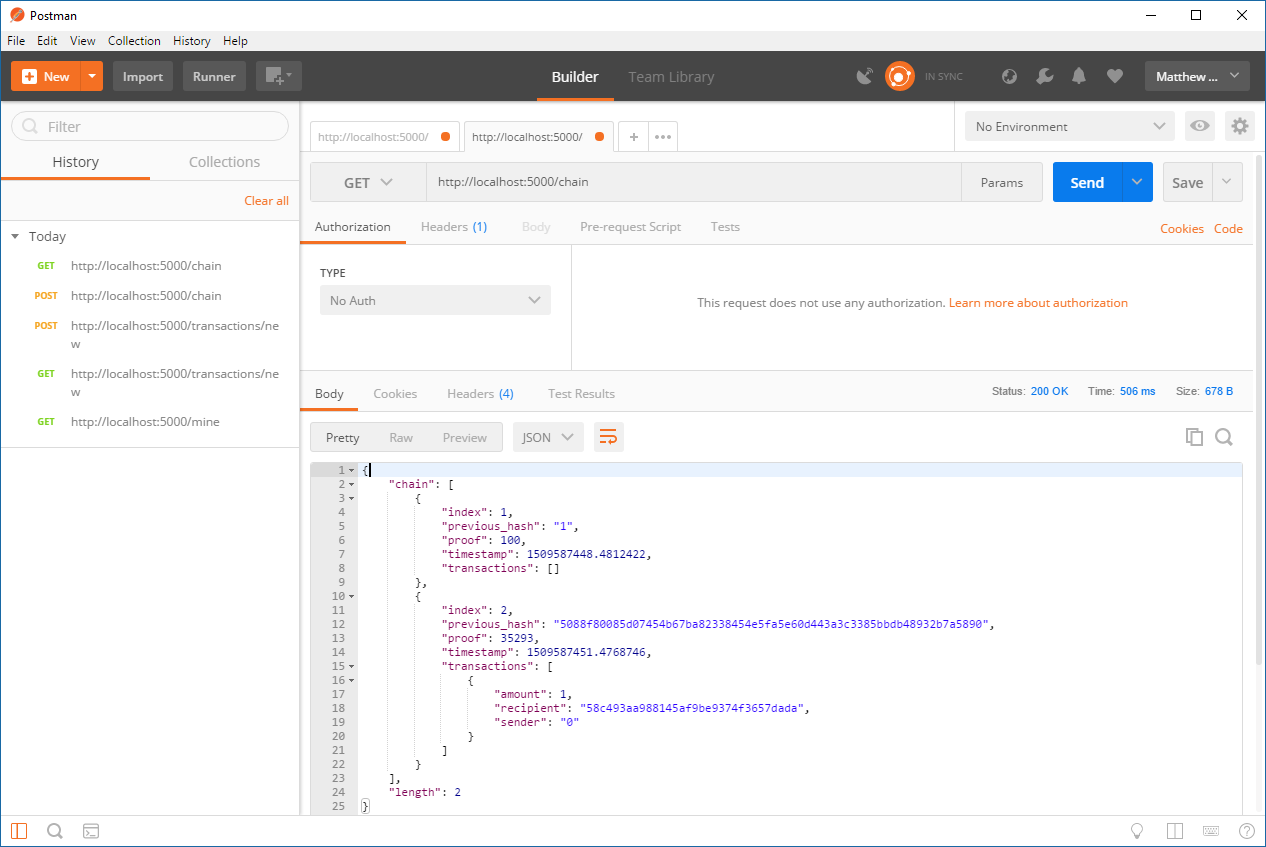
As you can see, we now have a new block, It's id'd by It's index "2" It has now hashed the previous blocks hash and has its own proof.
If you look further down, you can see our transaction, we sent an amount of 1 then there is the recipient's address and finally the sender is "0" to signify that this node has mined a new coin.
Success!! You have now built and interacted with your very own blockchain!
This lesson is based on material from https://github.com/dvf/blockchain which has this licence: https://github.com/dvf/blockchain/blob/master/LICENSE